

In my previous article, I explained various dispatch techniques available in theSwift programming language. Whenever we hear the term dispatch techniques, the two that come to mind are Static and Dynamic.
I highly recommend that you read my previous article if you haven’t already, so you can get some knowledge of dispatch techniques.
But if you think you know what they are, then let’s proceed!
How It All Started
Long ago, there was an article by Apple, which said Static dispatch outperforms dynamic dispatch. So you should always default to Static dispatch and only shift to Dynamic as and when necessary.
The core reason that we get performance gains when we go for Static dispatch over dynamic is because, in the case of static dispatch, the compiler is aware, at compile time, which method implementation of a certain class is to be called. This way, the compiler can tune in some optimization techniques like setting some flags or maybe, just maybe, if at all possible, convert the call to an inline dispatch (which is the fastest of all)!
Whereas, in the case of Dynamic dispatch, the compiler can only figure out which method implementation is to be called for a certain class at run time, i.e., whether base class method or child class.
This gives Static dispatch a performance gain over Dynamic.
How to Achieve Static Dispatch?
Now, as per the article, there are three ways to achieve Static dispatch or reduce Dynamic dispatch:
final keyword: This ensures that the particular class can never be subclassed, a particular method can never be overridden, and thus there can never be Dynamic dispatch.
private keyword: This restricts a method or variable’s visibility to the class itself. As per the article:
This allows the compiler to find all potentially overriding declarations. The absence of any such overriding declarations enables the compiler to infer the final keyword automatically and remove indirect calls for methods and property accesses
What this means is that, whenever we mark the method or variable as private , the compiler performs a search if that method or variable is being overridden anywhere. If it is, it will generate a compile time error. If it doesn’t find any overridden behavior, it will implicitly mark it with final .
Whole module optimization technique: This is a compiler flag, -whole-module-optimization , which now comes enabled by default for new projects from Xcode 8. In a gist, when we do not use this flag ( -wmo ), Swift compiler compiles all our .swift files that belong to one module separately. This restricts the compiler from adding certain optimizations, like inlining, since it will compile all the files separately and thus the compiler doesn’t know how different classes and their methods are related. Whenever we use -wmo , the Swift compiler compiles all these .swift files together and thus can add optimizations. If you want to read more about -wmo , there is good and detailed documentation here.
And Finally
After I read the article, there was only one thing on my mind:
Where’s the proof?
I know we have gone through a lot of theoretical concepts till now, but we are programmers. We love code. And what better proof than a code that proves all those concepts!
A small test
I created a small Performance Tester project, which is nothing but a bunch of Swift classes and some Unit Tests. This was the only way I could find to test the performance/speed of the code. You can clone the repository and see for yourself.
I’ve only used the final keyword, but you can use the other two approaches as well. I’ll tell you in a gist what the project components are and how to run the test cases.
There are just two files that matter to us in the project:
StaticDispatch.swift : This contains all the classes we’ll use for our test cases.
PerformanceTesterTests.swift — This is present under the PerformanceTesterTests group, which is our Unit Tests group and contains our test case.
I have added comments in both files to make it more self-explanatory.
To run a test case —
Uncomment line 36 in the PerformanceTesterTests.swift file, which belongs to our Static dispatch
Click the diamond icon on line 33 to run the test case
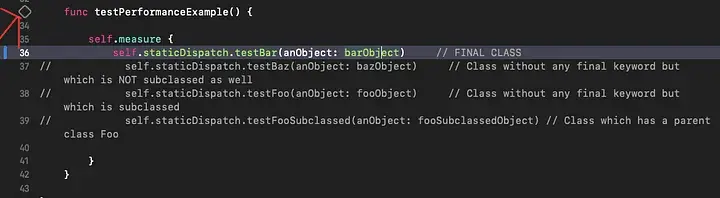
This will start the iPhone simulator. As soon as the simulator comes online, it will run the test case.
After the test case finishes, you’ll see the time it took to run that test case on the right hand side.

It might say “no baseline fixed” or something like that, but you need to click on the gray tick like the one in the image (you may need to click once more on the tick after the initial one), which will open a pop-up like this:
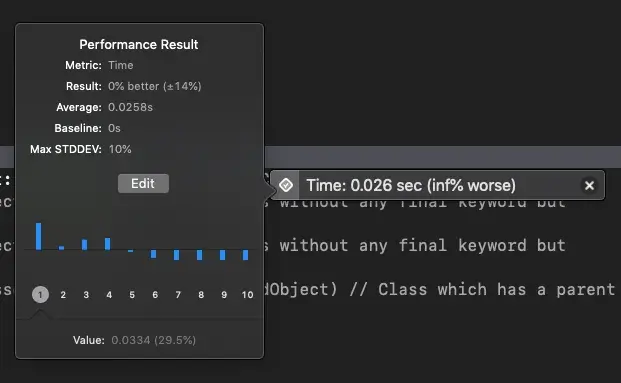
Now click on Edit -> Accept -> Save . This will take this time as a baseline and all comparisons will be made upon this baseline time that we saved.
That’s it! Comment the current line (line 36), and uncomment the next line (remember, uncomment only one line at a time), run the test case again, using line 33, and see the performance difference yourself. It will show you the % difference between the baseline that we set (our Static dispatch one) and our current test case.
Some Observations


So, to sum it all up, as a good practice, you should initially mark your class as final , and if inheritance is required, remove the final keyword. This ensures compiler optimisations and hence improves the code’s performance.
コメント